So I've been MIA from the blog for a while, but it's because my computer is dying. It getting up there in years and doesn't move as fast as it once did. So this means that I don't have the patience to sit around for 3 hours and load all the step-by-step Hardanger pictures I'd like to. I have, however, been knitting, embroidering, sewing, cooking, and baking. It's almost time to get the garden really going, so I'll be busy with that soon. And hopefully I'll be getting a new computer that will allow me to blog all that and more. Please bear with me, because I haven't abandoned ship! Either way, I hope to update/finish the Hardanger tutorial soon. Thanks.
Laura Kathryne
Saturday, March 24, 2012
Thursday, January 19, 2012
Narrowing Down My 12 in 2012 List(s)
I'm narrowing down a list of 12 cooking challenges in 2012. So far the most challenging things I've got on there are croissants from scratch, a lasagna from scratch (including noodles and cheese), and a fondant cake. Anybody have any recommendations for me?
And also, I'm thinking of a separate 12 sewing/crafting challenges in 2012. I don't have an embroidery machine, but I have a sewing machine and a serger. So if you have any ideas about that, please send them my way!
And also, I'm thinking of a separate 12 sewing/crafting challenges in 2012. I don't have an embroidery machine, but I have a sewing machine and a serger. So if you have any ideas about that, please send them my way!
Thursday, December 1, 2011
Hardanger Embroidery Tutorial Pt. 2 (Sew, a Needle Pulling Thread)
Once you've gathered all your materials, it's (obviously) time to get started. Unwind the size 5 perle cotton - the larger size - and cut it to about the length of your wingspan (arms stretched out as far as they will go). Depending on the project you're doing, it may or may not be enough to get you all the way around, but it's the most you really want to work with at a time. Plus, it's easy enough to start a new thread. Next, thread your tapestry needle.
The first thing to learn when doing Hardanger is called a kloster block. Essentially, it's a group of satin stitches to enclose threads in your fabric so you can later cut threads without it all unraveling. With the cloth in your non-dominant hand, and the threaded needle in your dominant hand, count in at least 20 threads from the side and 30 threads from the top. This can be on either side of the fabric, I just happened to start in the top right corner of mine. My fabric is already cut because I did another ornament out of it before. And also, I didn't count 30 threads down from the top so you'll see where I ran into a bit of a problem later. Pull the thread most of the way through, but leave a good-size tail on the back. You'll encase it in stitches later to keep it from pulling out.

Now, in the same row count in 4 threads (toward the middle, not the edge) and take your needle down and pull firm (not tight!). You may want to hold the tail in your fingers so you don't pull it all the way out...not like that ever happened to me, though (ha!).


On the backside, take your needle back 4 threads to the outside and up 1. As you pull the thread through, make sure you wrap around the tail. You'll catch it in every stitch on the back until you run out of tail or feel like it's significantly 'caught'.


 Repeat until you have five stitches on the front (enclosing 4 threads). You've caught the tail under each stitch on the back, right? You've made a kloster block!!! Now there's only 11 more to go if you're making this little ornament. I know Christmas is over, but you could be getting jump start on gifts for next year (or keep the first for yourself).
 You've been catching the tail on the back all the way around, right? It's probably secure at this point, but I like to run it under at least two kloster blocks just to be safe.
 So, with your thread on the back side, take your needle directly UP 4 threads rather than to the outside 4 and up 1. You're going to be starting in a new direction. The picture below shows the front side of the work. When you bring the needle up 4 threads toward the top, you're going to run it back down where your last kloster block ended...4 threads down again. You'll have the thread running through that hole twice.
 You're still catching the tail on the back, right? I'm not sure how long you left yours, but you'll probably want it long enough to catch at least most of the way through the second kloster block. When you get to the end of this block and it's still pretty long, you can trim it.
 I would also like to let you know that sometimes despite your best efforts, your thread will get tangled (pictured left). It may look like a knot, but usually if you pull on the correct loop it'll come loose. So be patient and work it out rather than pulling the ends of the thread and making it tighter. Use the needle to get in there if you need to. Or tweezers sometimes work.
 Back to the sewing: So after this block, you'll be turning your work to go up again and make another kloster block where the stitches within it run horizontal (like the first one we did). From where your thread is on the back, count up 4 threads and run it through that hole again. Yes, another thread is already running through there. Are you starting to see a pattern when turning? If not yet, well, you will. From where you just came up on the front, count 4 threads to the inside and go back down. On the back, count out 4 and up one and repeat until you have....that's right, 5 stitches. You're totally getting it! My tail has finally been about completely captured. Looking back, I probably should have trimmed it pretty short on the third or fourth stitch of that block rather than leave it poking out of the top, but hindsight is 20-20, right?
Turn your orientation again and run a kloster block of vertical stitches along the top. After this, the directions get a bit redundant. Make sure that when you turn your work, you're going through a hole you've already been through once. This anchors your threads so you can cut them later.


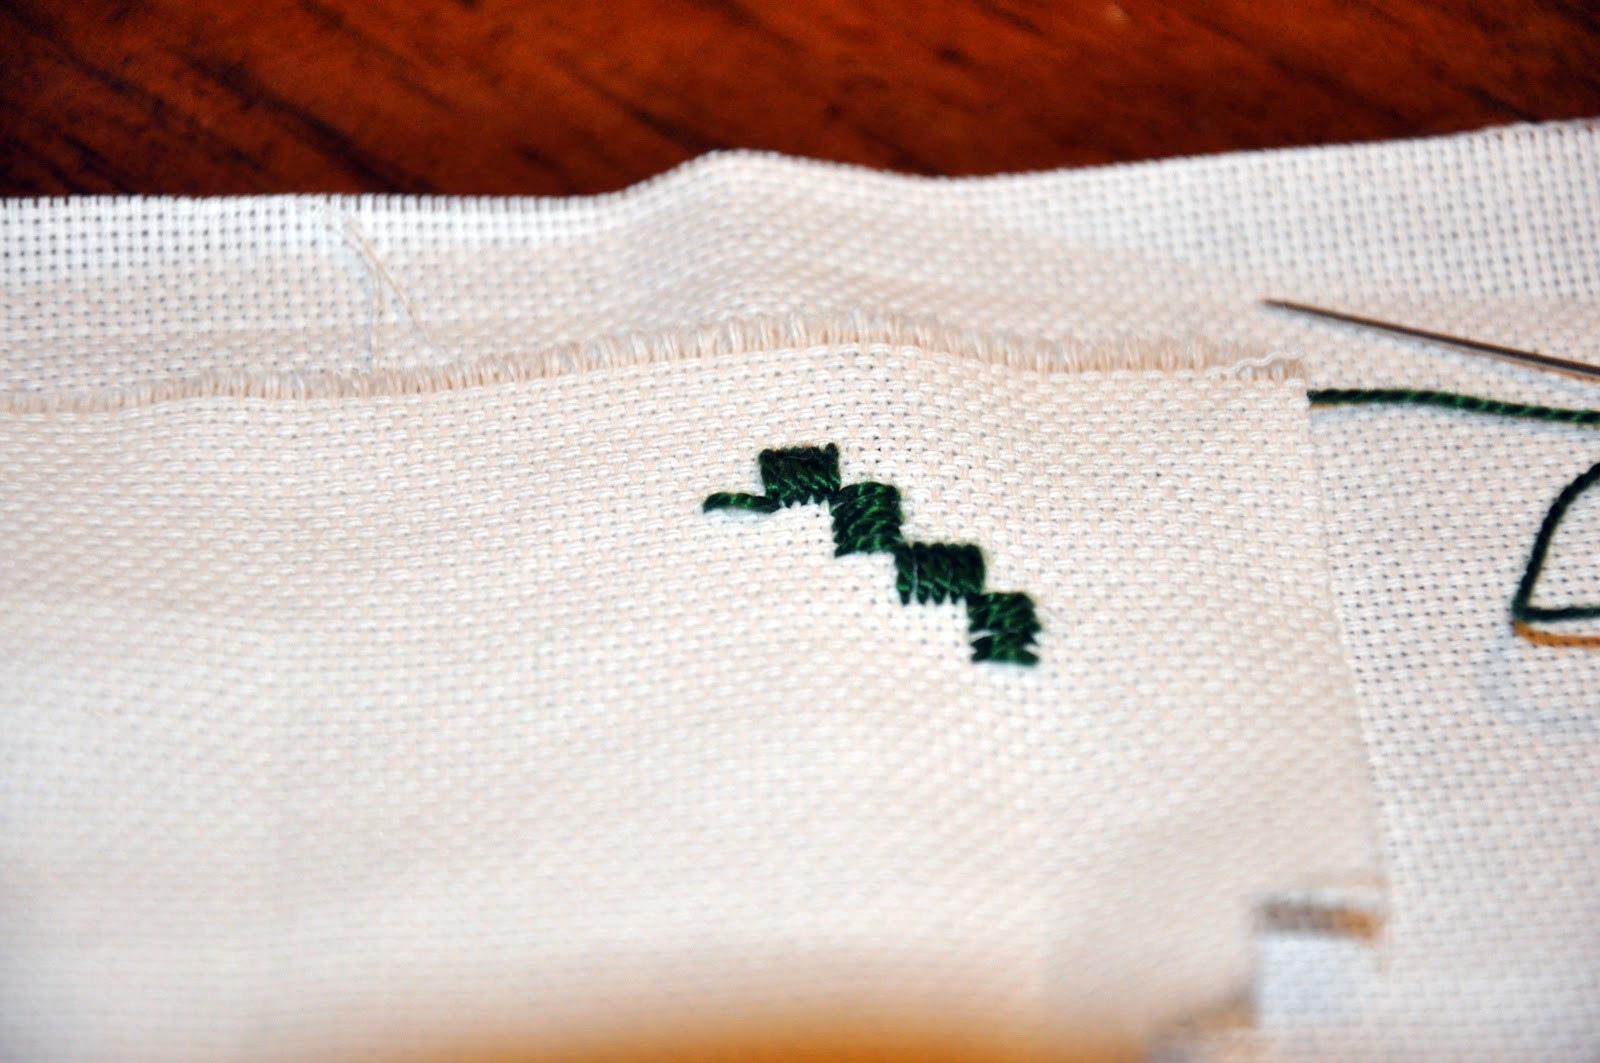


 And finally we make it all the way around. There are 12 kloster blocks in all and it looks a bit like a cross or a puzzle piece on the inside. Now all you have is the rest of your thread on the back side. I take my needle and run it under a kloster block or two, around the thread on the end of the block and back under the rest of the kloster block. This anchors it quite securely and you can cut it safely.

This concludes the first part of your ornament. Next up, the button-hole stitch all the way around and then lastly cutting out and embellishing the middle!
Part 1
Wednesday, November 30, 2011
Hardanger Embroidery Tutorial Pt. 1 (Gather Your Materials)
I made a little Hardanger Christmas ornament for the purpose of this tutorial. It took probably less than 6 hours all together, and a part of that 6 hours was taking about 100 photos so I could show you folks step-by-step. I've been doing needlework like cross-stitch for years, but this was only my second piece of Hardanger. My mother has been doing this for years, though, and taught me how, so this isn't really like the blind leading the blind. I've also asked her to check the tutorial for inaccuracies, just so I know I'm not telling you to do something incorrectly.
What You'll Need
Included in the photo are: Hardanger Fabric (a 22-count evenweave fabric) in white, ball-point hand needles or tapestry needles, tiny little scissors (!), and perle cotton in sizes 5 (skein) and 8 (ball) in matching colors. Not included in the photo is an optional hoop. I don't use one, but you can if you like.

Now I'll tell you a little bit more about the components. You can probably get all of these from your local hobby/craft shop (Hobby Lobby, Michael's, Hancock Fabric, JoAnn Fabrics), or you could get them from My Amazon Shop. *
- Fabric - What I'm currently using is actually called Hardanger fabric and I have it in white. It's an evenweave fabric woven in pairs (you'll see what I mean in the close up later) with 22 pairs per inch of fabric. This embroidery can be done on any evenweave between 18 and 26 count whether woven in pairs of singly (so linen is also an option). If you use a higher count fabric, the design will be smaller because the threads are more tightly packed. You may be able to find Hardanger fabric in Ivory or Ecru or even some other colors, but you definitely have more options with linen and Aida. I'd learn on Hardanger fabric though, before moving on.
- Needles - I included ball-point hand sewing needles in the picture because I used the for a while when I couldn't find my tapestry needles, but it's not the best idea. They split the thread and the fabric and can potentially cause some blood loss in your fingers, so go for the tapestry needles. They won't hurt when you accidentally stab yourself (unless you do it really hard), and they're much less likely to split the fabric and/or thread.
- Scissors - These are a pair of embroidery scissors given to me by my Granny. They are super cute. I'm not sure where you could find some with the same design, but any embroidery scissors will do.
- Thread - Perle Cotton in sizes 5 and 8 (or if you were doing this on a 26-count fabric you might want 8 and 12). This IS NOT the same as DMC floss that one would use for cross-stitch. Here I'm using a really lovely dark green so you can see the contrast better. Colors on white is fine, but white on white or beige on beige is traditional. My mom and I have a light blue-green fabric with matching perle cotton that we're going to do something intricate on when we have more time (lol - more time).
Next up, actually getting started.
* Laura is a participant in the Amazon Services LLC Associates Program, an affiliate advertising program designed to provide a means for sites to earn advertising fees by advertising and linking to amazon.com.
* Laura is a participant in the Amazon Services LLC Associates Program, an affiliate advertising program designed to provide a means for sites to earn advertising fees by advertising and linking to amazon.com.
Subscribe to:
Posts (Atom)